Summary
I was looking at ways to create QR codes and combining them with OpenCV. One particular library I was looking to use was Project Nayuki's QR Code Generator.
The license is MIT, which is generally what I use for all my projects. And it consists of a single .hpp and .cpp file, which is easy to drop into existing projects.
At first glance, I almost dismissed the library because I couldn't see an easy way to save or access the generated QR codes. But it turned out to be simple, and I wanted to document what I ended up doing.
Understanding Project Nayuki's QR Code Generator
Generating a QR code is extremely simple:
To understand what we need to do to access or display the QR code, we need to understand some terminology.
What is a QR code?
QR codes are composed of black and white spaces arranged in a square grid. What we normally think of as a "pixel", QR codes calls "module". This example QR code has a width and height of exactly 21 modules. That means a total of 441 modules (21x21), some of which is used for position markers, timing patterns, correction information, data, etc.
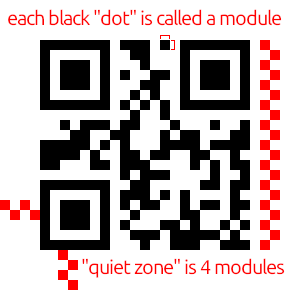
The empty white border around the QR code is called the "quiet zone". For standard QR codes, the quiet zone measures 4 modules in height and width.
This brings us back to our qrcodegen::QrCode object. There are 2 methods we need to call:
- qrcodegen::QrCode::getSize()
- qrcodegen::QrCode::getModule()
The getSize() method returns 21 for the example above.
And the getModule() takes 2 parameters -- X and Y coordinates which begin in the top-left corner -- and returns a bool to indicate if a module is white or black. false means white and true means black.
Using OpenCV
So if you call getModule() in a loop for all X and Y coordinates, you can build the QR code. The problem is if each QR code module maps to a single pixel, you'll end up with a QR code that is so small, it is unusable. With this example, having a size of 21, the QR code will be 21x21 pixels, which is too small to be usable.

The solution is quite simple. Each module in the QR code needs to map to multiple pixels, which results in a larger image. For example, instead of mapping a module to a single pixel, if each module maps to a square of 10x10 pixels, the previous example which originally measured 21x21 pixels would now measure 210x210 pixels:
That mapping of modules to blocks of pixels can be done with the following OpenCV code:
By specifying the maximum image size, this code will calculate the scaling factor that must be applied. It then iterates over the QR code modules. Every time a module needs to be filled in, we create a region-of-interest of the required size, and we set that entire region to black.
Conclusion
Turns out in my case, I needed more than QR codes for my project. I needed some 1-dimension barcodes as well so I ended up going back to Zint, which I've used in the past. But I was impressed with Project Nayuki's QR Code Generator and thought it deserved a blog post entry to show how easy it is to use with OpenCV.
